Fall is an Excellent Time to Plant!
The days are starting to cool off as we head into fall. Pest and disease problems are fading away, and rain is typically expected. Fall annuals and perennials, trees, shrubs, cool-season vegetables, spring-blooming bulbs, and turfgrass can all be successfully planted this season. Landscape plantings establish more quickly because they have stopped producing leaves and are directing their energy toward developing roots. Don't put those tools away just yet! There's still plenty to be done around the yard and garden. Let us help with our step by step guide to fall planting.
Step 1: Safely Haul Your Plants
Don't make your fall planting any harder than it needs to be! Heavy loads can really do a number on your back and joints but with the right tools you can take the strain off your body and make hauling your plants easy. We highly recommend the GardenGlide for transporting loads up to 200 lbs. With a low design, it's easy to roll or slide objects onto it without doing any heavy lifting. Wheelbarrows and garden carts also help you accomplish a lot while making minimal trips. Need an extra hand to help with lifting? The PotLifter has a pair of handles so two people can share the weight with less effort.
Tip: If you do find yourself having to lift a heavy object, stay safe by following these steps:
- Keep your feet shoulder-width apart for better support.
- Squat down, bending at the hips and knees while keeping your back straight.
- Slowly lift up using your hips and knees while maintaining a straight back.
- Hold the object as close to your body as possible.
- Carefully squat to set down the object, again only bending at the hips and knees.

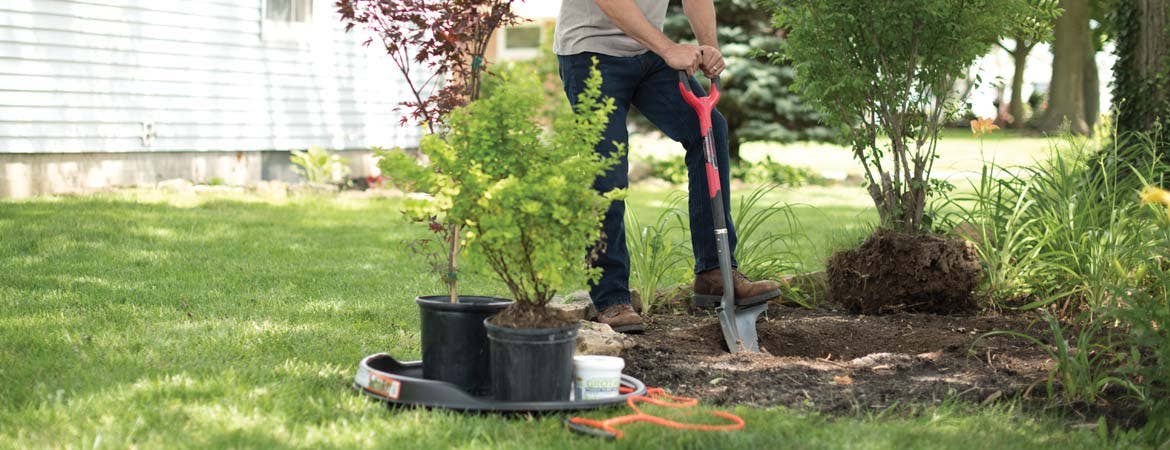
Step 2: Dig a Suitable Sized Hole
A properly sized hole can make a huge difference in the survival and successful growth of your plant. The size of the hole depends on the size of the your plant's container or the size of the rootball. Plants that are 3 inches or less should have a hole about 6 to 12 inches deep. For plants with containers greater than 3 inches, dig a hole about twice the diameter of its current pot. For trees, the hole should be at least 3 times the diameter of the rootball.
Basically, you want the hole wide enough so the roots can spread, and deep enough so the crown (where the roots meet the trunk or stem) or top of the rootball is at the soil line. The soil surrounding the roots should be loose to allow for easier growth. Compacted soil makes it harder for the roots to get the oxygen and water they need.
When returning soil back to the planting hole, known as backfilling, fill the hole about halfway and then gently water to help settle the soil. You can also add amendments to the bottom of the planting hole and more as you continue to add more soil to the hole. Finish filling the hole the rest of the way and water again.
If you're planting bulbs this fall, a good rule of thumb is to plant the bulb at a depth of three times the width of the bulb. If you purchased bulbs, you can also check packaging for recommended planting depth. The ProPlugger comes with adjustment rings to easily plant at the right depth and makes filling the hole super easy. Our deluxe soil knife has depth markings on the blade to ensure you have the right depth.
Planting cool-season vegetables? For square foot gardening, check out the Seeding Square. This color-coded tool simplifies the planting process with an easy to use plant-by-color approach. Just follow the included guide to find the right spacing and planting depth for your vegetables. For row planting, the BioGreen Super Seeder Row Planter takes the guesswork out of seed spacing and comes with six interchangeable discs to sow seeds as small as carrots to larger seeds such as beans.
Step 3: Feed and Amend Your Plants
Give your new plants the kickstart they need with the right fertilizers and amendments. These help reduce transplant shock and stress, activate the root system and microorganisms, increase nutrient absorption, and stimulate plant development. Amendments are especially important at planting time if you have poor quality soil.
Look for fertilizers and amendments with mycorrhizae and beneficial bacteria to get your plants off to a healthy start. A rich, organic fertilizer blend should be infused with a generous amount of beneficial bacteria and mycorrhizal fungi to stimulate rooting, vigor, and optimal plant development. Protilizer is packed with billions of proprietary beneficial microbes and mycorrhizae fungi to grow strong roots and secure plant health.
Tip: We recommend using a soil tester to find exactly what your soil needs.
Step 4: Keep the Roots Hydrated
New plants need steady, consistent watering to help them grow strong. How often and how much to water your plant depends on a number of things such as the type of plant, your climate, and the type of soil. Using tree watering bags or rings, soaker hoses, or other types of drip irrigation make watering really easy. These deliver water right to the roots, where it's needed most, and help reduce runoff and evaporation.
Tip: Use a soil tester that measures moisture to better determine how much water your plant needs. A rain gauge or water meter can also help you keep track of how much water your plant is receiving.
Step 5: Protect Your Plants from Damage
You've made an investment in your plants and worked hard to ensure they were planted properly, given the right amount of nutrients, and watered regularly. Don't let that hard work go to waste by having a hungry critter or unwieldy string trimmer damage your precious plants. We have a variety of tree guards, animal traps and repellents, garden insect control, organic solutions, protective netting, and more to help ensure the survival of your plants.
One Last Tip: As the nights grow colder, remember to protect tender new plants from frost! You can use plant covers, cold frames, tunnels or blankets, burlap, or a greenhouse to help keep your plants safe.