Indoor Seed Starting Made Easy
Starting your own seeds allows you to grow those unique varieties that you're not going to find in stores. Plus it's so rewarding! Many plants need an early start so that when the first frost date passes, you have big healthy plants ready to be transplanted. Whether you're new to growing or just looking for a refresher course, we have helpful tips to get your seeds off to a good start!
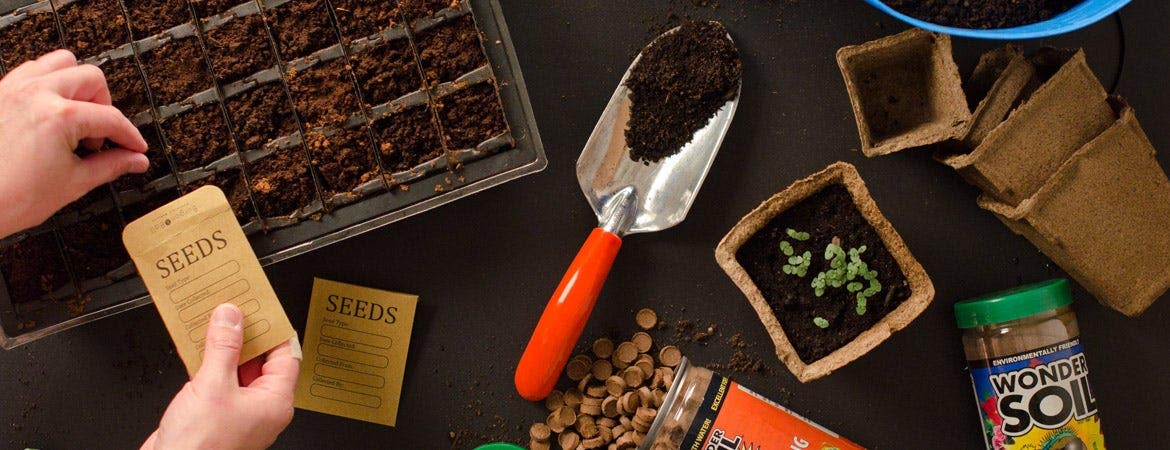
Organizing and Journaling
The first thing to think about with seed starting is organization and keeping records. Whether it's your first year growing or you're a veteran gardener, record keeping is extremely helpful. You want to keep track of what worked and didn't work so that your next growing season is even better. It's easy to think "how could I forget" — but a lot happens in a year! Getting a simple notebook (doesn't have to be fancy) and writing down seed starting dates, the day you transplanted them outdoors and a record of the temperatures keeps you from having to second-guess what you did the year bef> and Seed Envelopes are also a great way to store your seeds and keep them organized.
Pots and Trays
The most common things to start your seeds in are either individual pots or seed trays. You want to start with fresh, new, sterilized containers as soil borne diseases can live from year to year and may damage your seeds before they even have a chance. Biodegradable pots such as CowPots or Wonder Soil Coir Pots make planting easy, without any transplant shock. The pots simply degrade into the soil and there are no plastic pots to store for next year. Plants typically establish faster and produce higher yields.
When using pots, fill the pot 3/4 full, place the seeds and then put 1/4" – 1/2" of soil on top of the seeds. Do not compact the soil on top of the seeds. Leaving it loosely covered helps with air ventilation and helps prevent damping off.
Trays are another source to get you started. This method makes it easy to start multiple types of seeds in one tray; mark each plug spot with a garden marker to note the seed type and date it was planted. A couple of recommended tray options are the Rootrainers™ Propagation System and the Nurture HydroFloat Seed Starting System.
Fertilizers and Soil Mixes
Soil mixes need to provide good drainage and be free from pests and diseases. Most seed starting mixtures are light, airy and not dense, helping with drainage to prevent diseases and overwatering. It is best to not have any added fertilizers to a soil mix when starting seeds, as they can possibly "burn" new seedlings with too much nitrogen. Wonder Soil an excellent growing medium created from coconut coir, providing great drainage while avoiding any harsh chemicals.
Fertilizers are not needed in the germination process of seed starting. Seeds have all the nutrients they need to get them going until their first true leaf has grown. Once the leaves are showing that the nutrients have been depleted is when fertilizers should be applied. There are many options when it comes to fertilizers such as slow-release, root boosters and organic. Just make sure to follow the instructions on each type of fertilizer, as you don't want to put too much on your new tender seedlings and burn them.
Heat Mats, Ventilation, Domes and Grow Lights
A heat mat can be used with both pots and trays and come in multiple sizes to accommodate any space you have. Seeds need to be at a certain temperature to germinate. Most seeds have a range from 65-85 degrees Fahrenheit, although some can germinate as low as 45 degrees. The heat mat warms your soil to the desired temperature so that seeds germinate before the possibility of damping off (fungal disease) can kill them. The quicker the seeds germinate, the sooner you can have fresh food! Hydrofarm Seedling Heat Mats come in four different sizes to fit any space, allowing you to grow on your windowsill, in the basement, garage or a backyard greenhouse.
Ventilation and domes are needed to keep humidity for the seedlings and also to create a good environment with airflow. Once again, both of these are needed to keep damping off at bay. When the seedlings have emerged from the soil, keep them covered with a dome, giving seedlings the humidity they need to continue growing. Even though the seeds need humidity, they also need good air circulation and ventilation. Once a day, remove the dome to make sure the plants are moist and haven't dried out. Leave the dome off for a bit to give them some air. Remember, plants are living, breathing things and need oxygen just like we do. Some even suggest using a fan to increase air circulation and to help with preventing damping off.
Grow lights are used after the seedlings sprout and start to grow. The new plants will need 12 to 16 hours of light a day. Plants get a lot of nutrients from light (photosynthesis)and it is essential to their health. Even if you have a south-facing window that gets plenty of light, there is normally not 12 to 16 hours of daylight in the winter months when seed starting begins. There are lights and light carts specifically designed for growing. Our Grow Light Carts come in 4 different sizes and let you save space while vertically growing multiple trays of seeds at one time. The Growlight Garden is great for growing right on the kitchen counter and includes two SunBlaster 6400K T5HO fluorescent tubes in a curved reflective hood that floods the growing area in full spectrum light, four reusable segmented trays for planting, a reservoir stand, and wick sheet for easy self-watering.
Check out our Guide to Plant Hardiness Zones for more useful seed starting and planting information!
If you still have any questions about the seed starting process, send us an email at customercare@gardenersedge.com. We'd love to help!
Originally published January 2013
Updated March 2017